Danh mục tin

Manley Gold Reference Stereo Microphone
 The MANLEY GOLD REFERENCE MULTI-PATTERN MICROPHONES are a statement, quite simply, of the finest microphones that money can buy in the pursuit of truly accurate musical recordings. The Gold Reference Series employ our own design of large capsules (1.25 inch overall, 1 inch diaphragm diameter) which are executed to precise tolerances made possible by modern micro-milling machinery available today in California. The capsule rings and back-plates are milled from solid brass. The gold diaphragm film comes from Germany and is tensioned using proprietary techniques by David Josephson ensuring capsule-to-capsule constancy, combined with the speed, "air", and superb ultra-high frequency response you have only dreamt about.
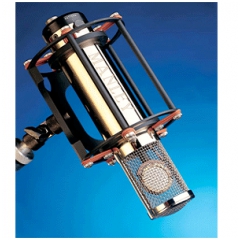
The STEREO version of our GOLD REFERENCE microphone is identical in every respect to the MONO GOLD REFERENCE but with two complete and carefully matched systems installed in one case with the upper capsule being fixed and the lower capsule being continuously ROTATABLE through 90° for M-S and X-Y BLUMLEIN-STYLE coincident pair recording technique. Each capsule has its own continuously variable PATTERN control and individual -10dB PAD switch.
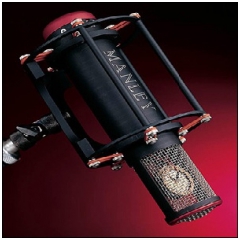
The all-tube electronics in the MANLEY REFERENCE SERIES MICROPHONES are built around two triodes in cascade forming an entire gain-block. We have recently switched to a dual-triode 112AT7 tube, easily obtainable and replaceable, mounted in a ceramic socket. (We originally used 6072A until it became impossible to find quiet ones out of the NOS dreck left on the market, then we used 12AX7 for awhile.) The output is coupled through a MANLEY output transformer of unparalleled quality and substantial physical size employing nickel laminations with "hum bucking" bi-filar windings, encased in mu-metal. The polar pattern control is continuously variable between the OMNI, CARDIOID, and FIGURE 8 positions vastly increasing this mic’s versatility. The Gold Mics make it possible to exactly tailor the proximity effect to achieve the desired character. We have chosen a very open weave stainless-steel grille for the capsule window which allows all the highs to reach the capsule unimpaired letting the engineer choose if, when, and how much pop screen is appropriate. As a result, the Reference Gold reaches to the furthest extremes of highs and lows with gorgeous natural acoustic smoothness. Some engineers tell us it sometimes "hears" more than they do!
The base of the microphone holds a locking 5 pin gold XLR connector for the audio signal out enabling usage of your own preference of audio cable – as exotic as you wish . A low capacitance 5-pin XLR-F to two 3-Pin XLR-M "Y" cable is included for your convenience. A detachable threaded 4-pin connector for the 30 foot power supply cable carries the stringently filtered B+ and regulated heater voltages from the separate dedicated power supply. The microphone body is machined from brass providing excellent shielding properties, polished to a high lustre, then plated with 24 karat gold for an impressive finish, inspiring confidence in artists and producers.
Our precision suspension system is provided with each REFERENCE MICROPHONE (the capsule itself is mounted onto a neoprene-rubber shock-mount.) Because the entire working "guts" of the microphone may be removed for service in one piece from the housing, it is envisioned that the microphone need not be removed from the suspension. We also provide a very useful swivel of our own design with every REFERENCE MICROPHONE; its T-bar handle and locking clutch action require no tools to adjust. And no MANLEY microphone would be complete without a genuine leather capsule protector with soft velour lining which slips (and ties) onto the end of the microphone to protect the capsule when not in use.
Each REFERENCE MICROPHONE is packaged complete in a strong locking carrying-case.
Check out the Gold Reference Multi PatternMic! - Check out the Manley Reference Cardioid Mic!
Features & Specifications
Manley Stereo Gold Reference Reference Microphone
- All-Tube triode design: 2 x 12AT7 specially selected for lowest noise (MIC GRADE)
- -10 dB switchable pads for each channel
- Frequency response: 10Hz-30KHz
- Sensitivity: 17mV/Pa
- Noise typically -120dB EIN
- Max SPL: 150dB
- Weight: 2.5 lbs (mic)
- Weight: 2.5 lbs (PSU)
- Size: 4.5" x 12.5" x 4.5" (mic)
- Size: 5" x 8.2" x 3.4" (PSU)
- Shipping weight: 15 lbs
- Custom transformerless internal preamp version also available to order
- Outboard Power Supply is factory set for 100V, 120V or 220-240VAC operation for original destination country's mains voltage.
- Operating Mains Voltage changeable with power transformer re-wiring via internal jumpers and fuse value change.
- Mains Voltage Frequency: 50~ 60Hz
- Mains Fuse: 250mA @ 100~120V; 125mA @ 220~240V operation
- Power Consumption: 70mA @ 120V = 8.4 Watts
Manufacturer's Suggested Retail Price
- Manley Stereo Gold Reference Multi Pattern Microphone: $8,000
Technical Notes
If you need to make a conversion, please download the necessary document under the downloads section on the right side of this page and then then request the schematic from Paul in our Tech Support department here. Or if you want to stick with the 6072 tube, you can try to find some on the open market. We have none in stock anymore.
Trouble Shooting Hints:
How to change the O-RINGS:
The mic suspension is held onto the mic by a set of red silicone o-rings connecting FIVE pillars surrounding the mic, one set on the top and the other on the bottom of the mic. There are two sets of stainless steel screws and spacer nuts that hold the silicone o-rings onto these points and all you do is loop the o-rings onto these posts inner and outer. You can double up the o-rings for extrasecurity and put two of 'em on each point and order two sets (20 total) if you'd like to.
If you needs to order more o-rings, you can order a set of them from our parts store, www.tubesrule.com. They are RED SILICONE #114 O-RING's.
How to change a TUBE:
Disconnect the power cable at the mic. Do not remove the mic suspension. You never need to.
Remove the three phillips screws at the base (red part) of the mic that hold the case on.
Grasp the body of the mic with one hand, grasp the base with the other hand.
Carefully pull at the base of the mic (sometimes a slight twist will help), and slide the base out of the bodyjust enough to expose the tube
Grasp the tube while holding the tube socket, and wiggle and pull to remove it. Install a new tube and put the case back on.
BUZZ! My mic started buzzing! Those damn bees...
First thing I would check is that all the case/chassis screws are in nice and tightand making good ground to exposed metal.Remove the 3 x silver phillips screws that hold the cover/case onto themic. You can slide the body of the mic up a little bit to check the holes on the base.Slide up and wiggle. (The base and guts of the mic are all contained by a sub-chassis.)Make sure there is silver metal on the case housing in thecountersink and also under them on the base piece. Use a 1/4" drill bit inyour hand and turn and press the drill bit a few times to make sure you haveexposed silver metal showing in those places. Put the screws back and test.Next: There are some little set screwsaround the circumference of the base piece hiding in their holes. Using1/16th allen key, back them out and run them back in. These are the guys whohold the XLR connector in place. We use stainless steel ones these days.Try those and re-test.
If the buzz is still there, with the mic on, see if touching the screen ortop of the screen makes any buzz go away. Hold the XLR cable shell so you aremaking the ground path. If the screen is loose, it will need to be expoxiedback in place with silver conductive epoxy. If touching the case makes thebuzz go away then we still have grounds not being made so repeat steps 1 & 2.
Next would be to replace the tube with any good working 12AX7 or 6072 youhave kicking around to see if it is the problem.
Next would be more advanced, checking the power supply volts, especially theheater regulator to make sure you have 12V coming off him...looking for a bad cap in the PSU that isn't doing his job of removing ripple, etc. If nothing you try works then we'll arrange an RA# for you to send it in.
You can fill in the service form here to get that going or to request a schematic.
Where is my mic's serial number?
The Manley Reference Microphone serial number is located on the inner face of the mic suspension plate flanking the hole where your mic stand attaches to the mic suspension.